Your User Profile Information
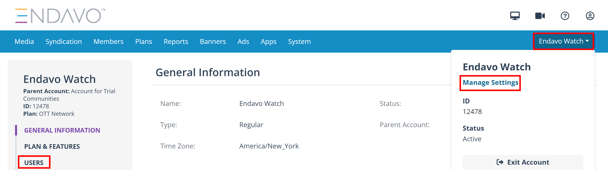
To edit and manage your personal user profile, you'll need to go to your User Information page. Click on your User Profile icon (top right of dashboard) > Manage Settings to update any or your personal user information.

Alternatively, you can also find your user information page in Account Settings > Users > [your user name].
- Personal Information - Click Edit to make any changes to your personal user information. Click Update to save.
- Change Password - Click Change Password and Update. You'll need to enter your current password to create a new password.
- Social Networks Connections 💡 Connecting to your designated social accounts will allow you to share video clips or restream live events to your connected social accounts. On your user profile page (near bottom), you can add social network permissions for sharing video clips on Facebook, Twitter, and YouTube. You will need your login information for each social network account if your device isn’t already logged in. Click on any of these to grant permission for your Endavo account to connect. Once connected, you can share clips from any videos in your library with immediate or scheduled posts (Learn More), and you can restream live and virtual live events (Learn More).
-
Review Login History - you can review your device login history on your Endavo account.
Add New Users and Manage User Account Settings
- To add or manage additional users on your account, go to Account > Manage Settings > Users
- Click Add New to set up a new user for your account or click on [user name] > Edit to edit an existing user.
- User Information: Click edit to change any general user settings and save.
- Access Levels: when you add new users, you can choose (and edit later) certain access levels for your account users.
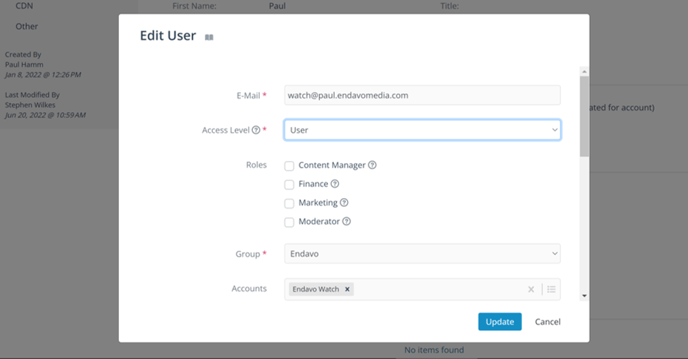
- Admin User - Admin users have access to all activated account modules and features and can also edit account settings.
- Users - Specifc Purpose Users
- Content Manager - Has access to all tabs an features with the exception of account settings and financial reports.
- Finance - Only has access to financial reports
- Marketing - Only has access to media, series, channels, categories for the purpose of managing metadata for SEO purposes.
- Moderator - Only has access to the Moderation tab to review, accept and deny pending media on the Moderation page.
- Notifications - activate for user to recieve moderation notifications (available for certain upgraded account plans)
- Comments - for internal use
🚀🚀Here are some other helpful hints to get your OTT Channel started and making money!
-
- Connect Stripe: If you want to sell subscriptions or accept one-time payments for content access, you’ll need to set your account up with Stripe. Under Account settings, find Payment Gateways. On that page, click on "Connect with Stripe" to set up a new Stripe Express account or to connect with your existing Stripe account. Once connected, it will activate subscriptions and plans so that you can set up subscriptions and rental plans that can be applied to your channels and content. LEARN MORE
- Add Subscription Plans: Once you activate your Stripe account, you can add subscription plans to any of your channels or overall site. LEARN MORE
- Connect Google Analytics: On your Account Settings menu, you can find Google Analytics to connect your ottchannel.com site (and apps if upgraded) to your Google Analytics account. Endavo is integrated with GA and we have built a multidimensional reporting module in your account, under the Reports tab, that allows you to build/filter specific reports that fit your needs and goals. You will need to create a Universal Analytics property in your GA account in order to get the Tracking ID and Views ID required to connect your Web App to GA in order for EMMS to pull GA data for our advanced views reporting. NOTE: When you add the property, click Advanced Options to create Universal Analytics property and check Universal Analytics Only option.
- If you need help setting up a Google Analytics account or property, you can find instructions here - https://support.google.com/analytics/answer/10269537?ref_topic=1009620
- IMPORTANT NOTE: After you set up your Google Property in GA, you will need to add the following user to that property in order to connect correctly. 126822886417-5lkdl7sjq0i0n29jsqmfueol7g1pi1sq@developer.gserviceaccount.com. When you add the user, uncheck "notify by email" and check all permissions before saving.
- For more detailed information click here.
Quick Links to Learn More About your Endavo Account
- Get started by understanding how your platform uses Media Items, Channels, Playlists and Categories. CLICK HERE to learn more.
- Add your logo to your site. CLICK HERE to learn how.
- Start a subscription service (like Netflix). CLICK HERE to learn how.
- Create a live event and sell pay-per-view tickets. CLICK HERE to learn how.
- Accept donations on your Web App (website), on a Channel or on a Live Event. CLICK HERE to learn how.
- Add some home page banners to your Web App (website). CLICK HERE to learn how.
Thanks for reading! Check out our resources and blog on our website to get more helpful tips, use cases, and creative ideas for building your OTT business.