You can manage your App settings and Options from the App page under the Apps tab. You can also add which Platforms you would like to apply to your App. OTT Channel accounts usually have a single Web App (and website) available, unless otherwise ordered. OTT Channel Pro, Platform and Network accounts may have multiple Apps and Platforms that can be viewed and edited.
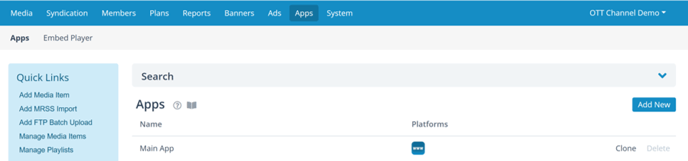
Tip: you can clone your app if you'd like to apply your existing App settings to another set of sites or platforms. Click Clone and give the new App a name and site URL.
View and Edit App Options and Settings
Click on App Name (e.g. Main App above) that you want to review and manage settings. You'll be taken to the App Settings screen:
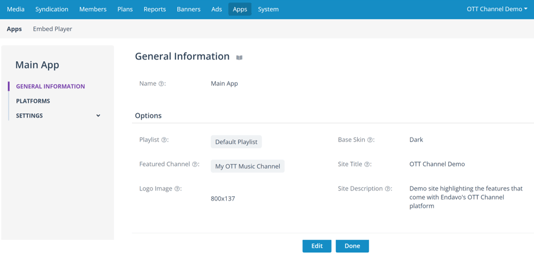 General Information
Click Edit to change your general settings for your App:
- Name - you can change the name of your Apps.
- Playlist - select an existing Playlist in your account. Learn more about Playlists.
- Featured Channel - optional setting to feature a specific channel on your home page with its own carousel.
- Logo Image - upload a logo that will be used in the header and footer of your App. Learn more about app logos and recommendations.
- Base Skin - choose White or Black background. Make sure your logo looks good on the background you choose.
- Site Title and Description - used mainly for admin and SEO purposes. Not published on your apps.
Platforms
You can add available platforms to your Apps (availability depends on account plan) and manage certain platform specific settings for each Platform added to your App.
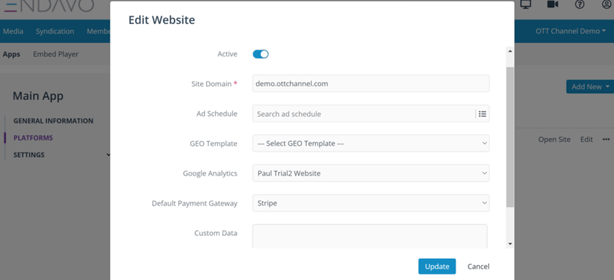
- Site Domain - You can edit your site domain here. If you have an OTT Channel account, you can only change the prefix (subdomain) on your ottchannel.com URL. For upgraded accounts, you need to contact support in order to redirect your Web App to other domains.
- Ad Schedule - If your account is enabled with Ads, you can add/change available Ad Schedules for each Platform.
- GEO Template - Apply available Geo Templates that you have created in your account.
- Google Analytics - Select your Google Analytics account that you have set up for each Platform in your main account settings. Learn more about setting up Google Analytics.
- Default Payment Gateway - Select your available payment gateway (e.g., Stripe) that will be used to process payment transactions within your App. Learn more about setting up your Stripe account.
App Settings
You can manage a full menu of settings for your App. We have published a separate article on App Settings. Go to App Settings article.
Thanks for reading! Check out our resources and blog on our website to get more helpful tips, use cases, and creative ideas for building your OTT business.