Manage your App Settings for you Apps under the Apps tab.
Note: This article only covers the Settings menu. Learn More about editing General Information and Platforms.
Tip: To get to App Settings screen, go to Apps from the top menu bar, then click on the App name you would like to review and edit.
App Settings Menu
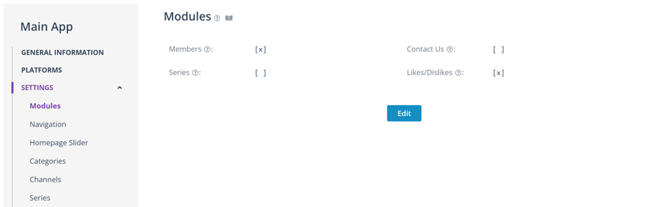
Modules - These settings take effect across your entire website (web app) and other apps as applicable.
- Members - Check if you plan to have registered members and put content behind registration
- Series - Check if you plan to publish Series (with seasons and episodes) on your apps
- Uploads - (if available for your account) Check if you have member upload feature available and want to have it activated on your website (web app)
- Contact Us - Check if you want to add a Contact Us page to your website (web app)
- Likes/Dislikes - Check you want viewers to be able to like and dislike individual videos on your website (web apps)
Navigation - Manage your top main navigation (top menu) on your website and apps.
- Show Videos - Check if you want to have a page listing all your published individual video thumbs on a single page
- Show Series - Check if you want to have a page listing all your published series images (series module must be checked)
- Show Channels - Check if you want to have a page listing all your published channel images
- Show Channels as Dropdown - Check if you prefer to have a dropdown list of all your published Channels vs. a a page with list of channel images
- Show Categories - Check if you want to have a page listing all your published category images
- Show Categories as Dropdown - Check if you prefer to have a dropdown list of all your published categories vs. a page with list of category images
- Show About Us - Check if you want an “about us” page (contact support to add page)
- Show Live - Check if you want to have a page that only displays a live channel or event
Homepage Slider
- Add or change the banner group that you would like to display on your home page
Categories - Settings for Categories page and lists
- Image Type - select the image type for the Categories page and lists. If the selected image is not uploaded in the Category information page, your default image will be used.
Channels - Settings for Channels page and lists
- Image Type - select the image type for the Channels page and lists. If the selected image is not uploaded in the Channel information page, your default image will be used.
- Excluded Channels - select channels that you do not want to be displayed on your Channels page (e.g., Featured channel)
- Order By - select the ordering of channels on your Channels page
Series - Settings for Series page and lists
- Image Type - select the image type for the Series page and lists. If the selected image is not uploaded in the Series information page, your default image will be used.
- Episode Image Type - select the image type for Episodes lists. If the selected image is not uploaded in the Media information page, your default image will be used.
- Series Label - choose the top navigation label
Media - Settings for Media page and lists
- Videos label - choose top navigation label
- Image Type - select the image type for Media (video) lists. If the selected image is not uploaded in the Media information page, your default image will be used.
- Allow Guest Comments - check this box if you want public guests to post comments. Uncheck if you only want signed in users to post comments.
- Show Views and Viewers - check if you want each video to show view count under the player. Uncheck if you do not want to show view count.
Members - select member preferences on your site and apps
- Sign up - Check if you want public visitors to sign up for membership. Uncheck if you plan a private site and apps with controlled members (note: if Member module is unchecked, Sign up will show “N/A” and not available)
- Phone - check to provide phone field on sign-up form (optional)
- Birth Year - check to provide birth year field on sign-up
- Notifications - check to allow users to opt-in for notifications
- Address - check to provide address field on sign-up form (optional)
Member Uploads - settings for handling member uploads (if activated in your account)
- Restrict Role - choose member roles that can upload videos or allow all roles (default)
- Moderation Status - choose whether member uploads are automatically approved and activated in your account & playlists, or choose “pending” if member uploads need to be approved before activation (Media > Moderation tab)
- All other settings - check to add field in upload form (optional)
Payments - viewer payment settings
- Donations - check to allow donations button in your site header.
Thanks for reading! Check out our resources and blog on our website to get more helpful tips, use cases, and creative ideas for building your OTT business.