- Adding New Live Event - Add live or virtual live events by clicking the Add Live button on the Media page. You should see the following page:
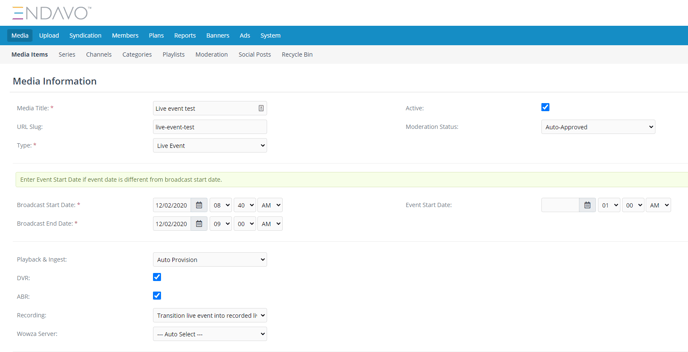
- Completing Live Event Form - Complete the basic required fields in order to create a new live event. Required fields are indicated:
-
- Title (required)
- Type (required)
- Choose Live Event if event will be entirely connected to your live broadcast on location. You will connect your broadcast software with our platform using the Stream Server and Stream Key provided once you Save your live event.
- Choose Virtual Live Event if event is a scheduled broadcast that includes pre-recorded videos from your uploaded library, live slots to broadcast live from your location (optional), and slates created with static images or videos (see Slates)
- Broadcast Start and End (required) - Choose the date and time for your live event to start and end. The live event player page on your website will show an event countdown before the event begins and an “Live Event Ended” message after the event is over.
- Playback & Ingest - select Auto Provision.
- Landscape Image - Upload an image (1920 x 1080) that will display on the live event player before (behind countdown) and after the event.
-
- Connect Broadcast Software to Endavo - If you are doing a live event or have live slots in a virtual live event, you will need to connect your broadcast software to Endavo. You need to add the Stream Server and Stream Key to your software and make sure your settings comply with our requirements and recommendations found here (link to our live broadcast guidelines). NOTE: We provide instructions to set up OBS encoding software to connect with Endavo servers - CLICK HERE. Other encoding software are supported and will likely use similar instructions.
- Test Live Broadcast - You can test your broadcast connection to Endavo in EMMS prior to your event by activating a live stream once connected and clicking the Test Live Ingest button on the bottom of the Live Event information page.
- (💥 NEW 💥) Recurring Live Events - If you would like to create a live event that recurs weekly at the same day/time each week, select Recurring option. LEARN MORE
- Add Virtual Live Event Schedule - Once you have saved a new Virtual Live Event you can add/edit your schedule by clicking the Edit Schedule button on the live event information page. Drag any videos from your list on the left to the schedule or right-click over a time slot and add a video or live slots. If you add live slots, you will need to connect your local broadcast software to Endavo by adding Stream Server and Stream Key and following instructions for Connecting Broadcast Software.
- Add Live Event Paywall - Add a pay-per-view (PPV) Live Rental Plan to your live event when adding/editing your live event by clicking Rental Plan and choosing your Live Event Rental Plan to apply.
***Important Note: You must have a payment gateway activated and a Live Event rental plan set up under the Plans tab in order to add a rental plan to your live event. CLICK HERE to learn more about setting up your payment gateways. CLICK HERE to learn more about setting up Rental Plans. - Live Event Trailer - Add a trailer to your live event by scrolling down to Trailers on your Live Event information page and clicking Add New button and follow instructions to upload the trailer video.
- Record Live Event - To provide on-demand access after the event by selecting the Recording option when adding/editing the live event. Recording a live event also preserves the live chat session from the event. Note: If your live event is behind a rental plan, you can allow recorded live events to be accessed for free by purchasers and add a VOD rental plan for other viewers. Access settings can be added/edited on the rental plan chosen under the Plans tab.
- Start Over and Rewind - You can allow live event viewers to scroll back to the beginning of the event (up to 2 hours) and generally scroll around by checking DVR when adding/editing a live event.
- Interactive Live Event Features - You can add interactive features to your live event by selecting features you’d like to enable when adding/editing live events.
- Chat - Check Chat if you want to provide a live chat area alongside the live event.
- Donations - Check Donations if you want to add donations specifically for your live event. Note: The payment gateway must be activated to see this option.
- Web Conference - You can add Zoom meeting by adding Zoom meeting URL. Note: Zoom meetings are managed through your Zoom account. CLICK HERE to learn more.
- Poll - Add a poll or trivia by adding Google Forms URL. Note: Polls and Trivia are managed through your Google Forms. CLICK HERE to learn more.
- Social Wall - Add a walls.io social wall by adding embed code provided by walls.io. Note: Social wall is managed through your walls.io account.
- Shop - Add a Shopify storefront by adding a Shopify embed code provided by Shopify. Note: Shopping is managed through your Shopify account. CLICK HERE to learn more.
-min.png?width=481&name=live%20event%20page%20website%20(1)-min.png)
Live Event Best Practices and Tips
-
- Any changes made to your event will take up to 15 minutes to reflect on your site and apps due to caching.
- It is not recommended to make last-minute changes to your live event just before the event start time.
- Do not change your event URL information immediately prior to the event start time. URL changes may cause errors.
Thanks for reading! Check out our resources and blog on our website to get more helpful tips, use cases, and creative ideas for building your OTT business.