Welcome to Endavo. We’re thrilled you’re here! Endavo helps you create your own OTT Channel, broadcast Live Interactive Events, and so much more. But best of all, you'll be able to monetize your channel your way!
But, before you build your digital empire with all the advanced Endavo features at your fingertips, let’s GET YOU STARTED with the basics 🚀…
Here are the basic ingredients you need to get your OTT Channel started:
- Create a Channel Logo. You may already have a logo for your brand. That's great! But let's make sure it's formatted for your OTT Channel site and apps. Preferred logo size for your Web App logo is minimum 100px height for best display. We auto-reduce the size to 40px on the Web App, so your logo should look satisfactory at 40px height, preferably a horizontal format (L > H), like this one (Learn More):

- Create Banners for your Home Page. Start with at one or two, you can add more later. You can learn to use home page banners to promote and link directly to content, events, etc. - Learn More. Your Banner size should be 1920 x 685 (or same ratio), like this one:

- Create Graphics for your Channels. You need 2 basic image sizes for each of the channels that you add in your Endavo account - Banner and Landscape. Channel landing pages will use banners and landscape images are used for various channel lists across your OTT Channel site and apps. Your Banner size should be 1920 x 685 (or same ratio) and your Landscape graphic should be 1920 x 1080 (or same ratio), like these:


- Your amazing Videos, of course! It's best to upload at least 5 videos to add to your channel to fill a home page, but you can start with as many or few as you have ready now.
You can CLICK HERE to see a demo OTT Channel site, so you can see what your basic site should look like once set up.
Now that you have the basic ingredients, Let's Get Started and you'll have your basic OTT Channel up and running in 4 easy steps! 🚀🚀
Here's a video intro (go full screen):
Basic Steps to Get Started
-
Create your Channel
-
Upload Videos
-
Add your logo to your OTT Channel Site
-
Add home page Banners
NOTE: when you first log in, you’ll use the tabs at the top of your screen to navigate the Endavo dashboard or free trial users will see a Get Started page to make getting started even easier:
or

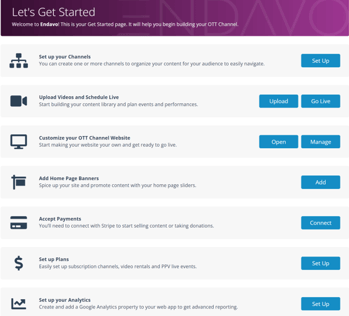
Learn more about using the Get Started page.
Create your Channel
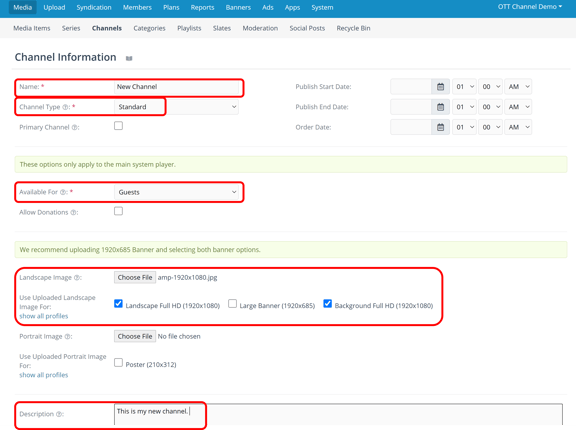
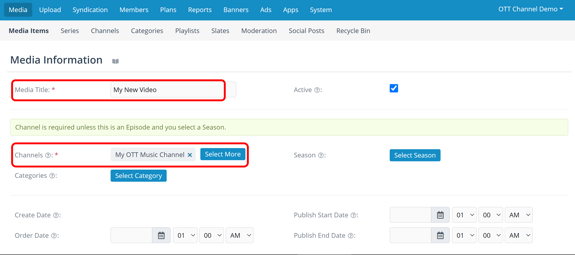
Step 1. Add your new Channel. All videos and events must belong to a Channel, so it's a good idea 💡 to create your initial Channels before uploading videos or adding live events. Create your Channel by clicking Channels > Add New. To set up a basic channel you just need to complete a few things on the Channel setup/edit screen (you can edit later to add more options).
-
- Add Channel Title.
-
- Type - choose Standard unless you are planning to upload episodic content into a season that gets added to a Series.
- Available For - choose Guests unless you want members or subscribers only to have access to the channel.
- Landscape Images - here you will do 2 uploads: upload your 1920 x 1080 Landscape image and check the Landscape and Background boxes; after saving Channel, then edit Channel to add your 1920 x 685 Banner image and check the Banner box.
- Description - add your channel information here.
Upload your Videos
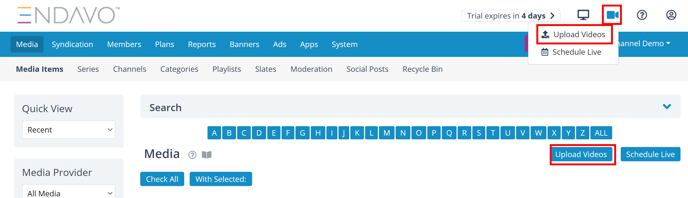
Step 2. Upload your Videos. Getting videos added to your Channel is a 2-step process: Upload and Activate.
-
- Upload - easily upload your files from your hard drive, Dropbox or Google Drive account. FTP can be used for large/bulk uploads.
-
- Click on the New Video icon in the header of your dashboard or Upload Video button on the main Media page.
- Upload files from your local drive or from your Dropbox or Drive account:
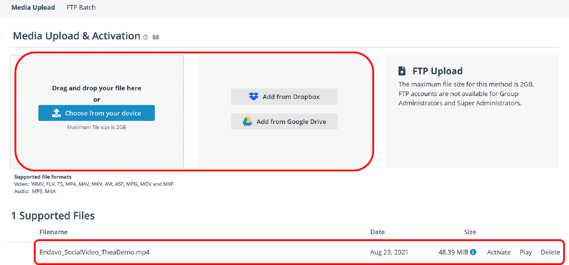
- Activate. When you successfully upload a new video, you will be taken to the activation form for that video. You can complete the basic information to quickly activate videos by adding a Title and adding to a Channel, then come back and edit later to add more information and options. It's a good idea to add as much information as possible to all your videos, including good description, for discovery and search engine purposes. You can also choose to activate later. Note: To activate files that were not activated upon upload, your can click Activate on an uploaded file to get it added your channel and account.
- Click on the New Video icon in the header of your dashboard or Upload Video button on the main Media page.
💡Pro Tip: The Endavo system will automatically create your video "thumbnail" (Landscape image) for display on your Web App, or you can upload your own or choose your own frame from video (after item is saved). You can also upload your own portrait images if you plan to use them at any point.
Add a logo to your OTT Channel site
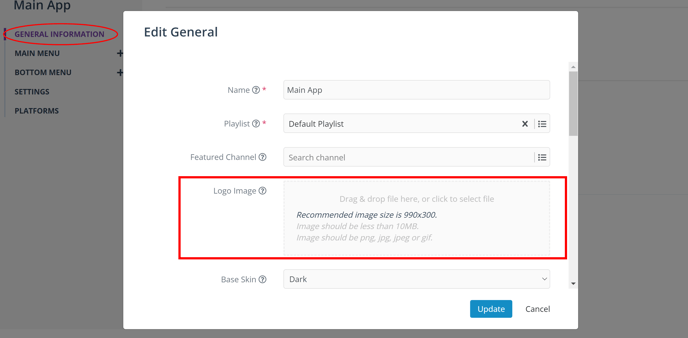
Step 3. Add your logo to your OTT Channel site to start making your channel your own brand.
-
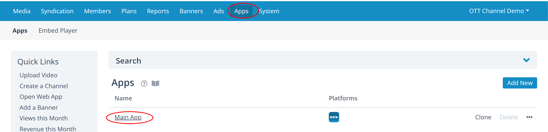
- You need to go your App Settings to add your logo (Main App has been created by default - you can change the name). Apps > Main App
- Once on the App Settings (Main App default) section, click Edit on the General Information screen and add your logo to the Logo Image upload area and click Update when finished editing the form.
- You need to go your App Settings to add your logo (Main App has been created by default - you can change the name). Apps > Main App
Add Home Page Banners
Step 4. Add Home Page Banners to your site for branding and content promotion.
-
- Banners - upload one or more 1920 x 685 banners you'd like to put on your home page, By clicking Banners > Add New. Complete the form and upload your file (check both size boxes). If you already have a home page Banner Group created, add the Banner to the group. If you are using the Banner to promote a channel or content, add a Link as shown below.

- Banners - upload one or more 1920 x 685 banners you'd like to put on your home page, By clicking Banners > Add New. Complete the form and upload your file (check both size boxes). If you already have a home page Banner Group created, add the Banner to the group. If you are using the Banner to promote a channel or content, add a Link as shown below.
💡 QUICK TIP: For new OTT Channel Trial accounts, we have already added a Banner Group that is already assigned to your Web App. You can just add Banners to the Homepage Slider group or create your own Banner Group. If you create a new group, you must assign it to your App Options in order for it to be published to the respective App (see below):
-
- Banner Groups - if you would like to create a new Banner Group (optional) that you can apply to your Web App (Homepage Slider added by default), then simply click Banner Groups > Add New to create a new group. You can add existing Banners to your new Banner Group after you Save it or you can add Banners to Banner Groups on the Banner edit screen (shown above).
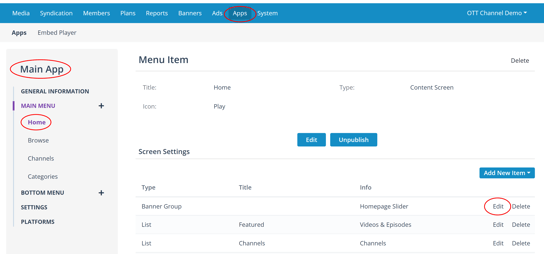
- Add new Banner Group to Apps (optional) by clicking Apps > Main App > Home > Banner Group > Edit. Simply select your desired Banner Group, then click Update once changed.
Manage and Change Playlists
Step 5 (optional). Playlists dictate the content (channels) from your account being published to your OTT Channel, apps or syndicated outside your account (advanced). Playlists are then assigned to your Apps in App Settings section.
💡 QUICK TIP: for new OTT Channel Trial users, we have already set up a Default Playlist and assigned it to your Main App Options. We have also checked Auto Add Channels to your Default Playlist, so any new channels added will get added to the Default Playlist, therefor your Web App.
-
- To manage a Playlist, just click on Playlist tab and click on a playlist name. You can change options by clicking Edit then Save, or scroll down to add/remove channels and individual videos on your playlist.
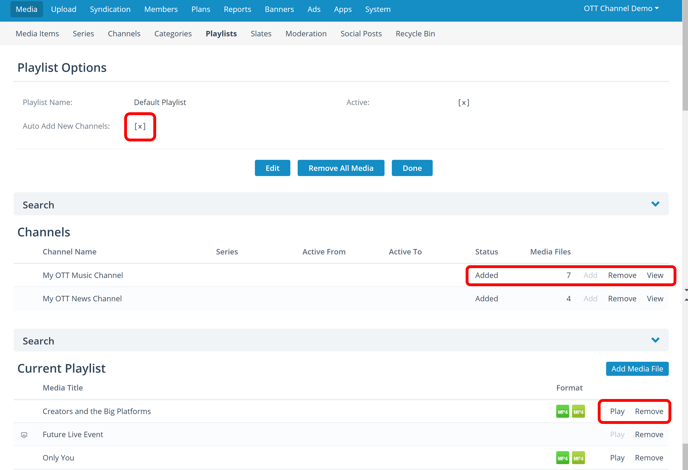
- If you want to create a new Playlist (optional) click Playlists > Add New, then complete the short form and save. Then click to manage playlist.
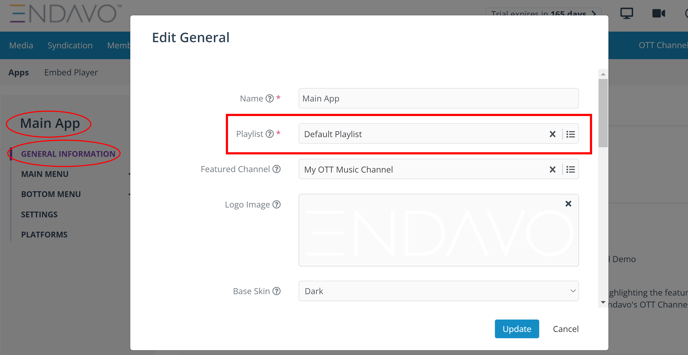
- Add or change Playlist in your Apps (Main App by default) by clicking Apps > Main App > General Information > Edit > Select Playlist > Update.
- To manage a Playlist, just click on Playlist tab and click on a playlist name. You can change options by clicking Edit then Save, or scroll down to add/remove channels and individual videos on your playlist.
At this point, you should have your basic OTT Channel up and running. You’re ready to share your awesome content and brand with the world and we’re stoked about that! But there is SOOO much more OTT superpower at your fingertips. To learn about more advanced Endavo options, like setting up subscriptions, live pay-per-view events, donations, and more, please review more Getting Started articles to keep going 🚀🚀🚀