Upload direct sponsor content into your account and publish on your OTT Channel and apps.
One great way to monetize your channel or community is to activate direct sponsors who will pay to have content on your OTT Channel and apps. This article will help you upload and organize your sponsor content directly in your Endavo account, and publish sponsor content in dedicated content lists for the best user experience and to highlight your sponsors in dedicated spaces (lists) on your channel and apps.
Upload and Organize Sponsor Content
You can upload sponsor content into your account just like you upload any other content. LEARN MORE about uploading content into your account. But it's important to organize your sponsor content in a way that allows you to easily create dedicated content lists that showcase your sponsors in their own space on your channel and apps, and not get comingled with your main content lists if desired.
Follow these steps:
- Create Sponsor Channel and/or Category
- Option 1 - If you want all your sponsor content to be published together on one or more pages on your OTT Channel and apps, then adding a Sponsor channel may be the easiest option. Create a "Sponsor Content" (or any desired name) channel by clicking Media > Channels > Add New.
- Option 2 - If you have sponsors for one or more specific channels and want to separate and publish sponsors only on those channels on your OTT Channel and apps, then creating a Sponsor category and assigning sponsor content to specific channels (see below), will work best. Create a "Sponsor Content" category by clicking Media > Categories > Add New.
-
Upload and activate your Sponsor content just as you upload standard media items.
- Option 1 - Assign Sponsor channel to your media item
- Option 2 - Assign Sponsor category to your media item and assign to one or more specific channels being sponsored
- Add all other desired metadata in the media item form
- click Save
💡 Pro Tip - Even if you choose option 2 to organize sponsor content by category, you can also have a "sponsor" channel, in case you'd like to publish an all-sponsor channel, have a default sponsor channel (non-published) to hold sponsor content until applied to other channels, or for other special purposes.
Publish Sponsor Content
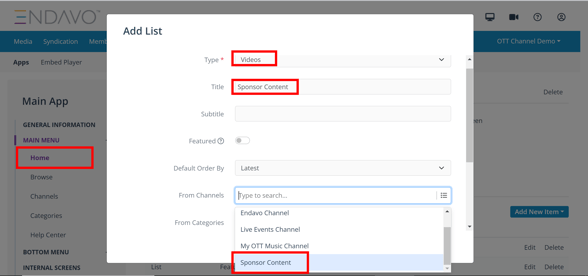
Add All-Sponsor Dedicated Content Lists to Main Menu Pages (Option 1)
-
Add a list to any Main Menu page by clicking Apps > [select app] > Main Menu > [select page] > Add New Item > List
-
Complete List Form
-
Type > Videos
-
Title (whatever you want)
-
From Channel > Sponsor Content (or whatever you named your Sponsor Channel)
- Click Create
-

Add Sponsor Content List to Specific Channels (Option 2)
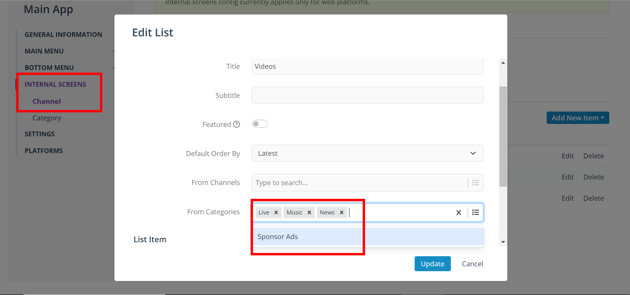
If you want to add sponsor content lists with sponsor content that is assigned only to specific channel pages, you will need to add a list to Internal Screens > Channel.
❗ Important Note - this setting will apply to all channel pages since internal pages are templates that are applied to all channels or category pages. But we will show you how to make sure channel sponsor content only gets published to the specific channels you want.
The following steps assume that you have uploaded Sponsor content following Option 2 above, applying content to Sponsor category and to desired targeted channels.
- In your App settings select Internal Screens > Channel > Add New Item > List
- Compete List form
- Type > Videos
- Title (whatever you want)
- From Categories > Sponsor Content (or whatever you named your Sponsor category)
- Click Create
.png?width=632&height=293&name=Sponsor%20List_Channel%20Page%20(internal%20screen).png)
💡 PRO TIP - With Option 2 organization by Category, You can also add sponsor content to any of your main pages by adding lists - Main Menu > [select page] > Add Item > List > [complete form as instructed above with sponsor category]. However, if you are not assigning Sponsor Content to specific channels then you will need to still have a Sponsor channel since all content has to be assigned to a channel.
Removing Sponsor Content from Main Content Lists
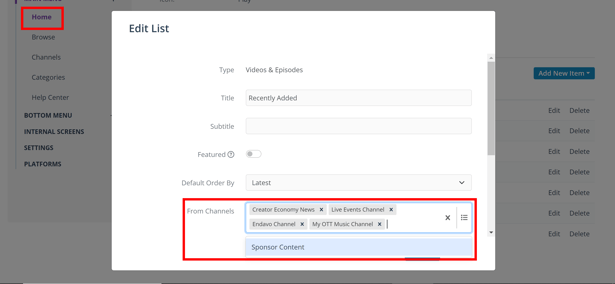
if you have added Sponsor content to your account and want to exclude Sponsor content from your main video lists (e.g., channel content lists, home page lists, etc.) you will need to edit your lists to not include either the Sponsor channel (if you added Sponsor content to a Sponsor channel (option 1 above)) or Sponsor category (if you added Sponsor content to a category (option 2 above)).
Remove Sponsor Content by Category in your Internal Channel Pages
- Go to your Internal Channel pages lists by clicking to Apps > [select app] > Internal Screens > Channel
- Select List > Edit
- Add all categories to your list except Sponsor category
- Click Create

Remove Sponsor Content by Channel in your Main Menu Pages
- Go to any Main Menu page by clicking to Apps > [select app] > Main Menu > [select page]
- Select a List > Edit
- Add all your channels to your list except Sponsor channel
- Click Create

